
Installation of a dimpled drainage membrane
Last updated:
The membrane fails due to incorrect orientation, insufficient overlap or a lack of drainage — not because of the material itself. Step-by-step installation.
The system at a glance
- DRAIN E 400 | Dimpled drainage membrane
- DANODREN H15 PLUS | HDPE dimpled drainage membrane with geotextile
- MAXISTUD GEO | 20mm HDPE dimpled drainage membrane with geotextile
- QDRAIN C20 65 10F | 20 mm drainage geosynthetic
- GEODRAIN | Perforated drainage pipe
- GEODRAIN PLUS | Drainage pipe with geotextile
- NW Standard | Non-woven polypropylene geotextile
- ESHAPROTECT | HDPE protective membrane
- ESHADIEN SBS -20 | Elastomeric bituminous membrane
- ESHAHYDROBENT | Water-swelling bentonite cord - waterstop
Solutions & Applications · Geosynthetics
The dimpled drainage membrane — commonly known as ‘dimpled drainage membrane’ — does not waterproof; it protects. It creates a ventilation gap and directs water towards the base, shielding the waterproofing from mechanical damage during backfilling and from root penetration. Its failure is not due to the material itself, but to the incorrect orientation of the cones, insufficient overlap or the absence of drainage at the base.
What a Dimpled Drainage Membrane Does — and What It Doesn’t Do
It is an HDPE sheet with embossed circular cones. It serves three purposes, none of which is waterproofing:
- Drainage and ventilation gap: the cones keep the soil away from the wall so that water can flow freely towards the base.
- Mechanical protection: absorbs the stresses from the backfill, which would otherwise damage the waterproofing layer.
- Root barrier: acts as an additional barrier to prevent roots from penetrating the waterproofing.
The dimpled drainage membrane is installed over the completed waterproofing — never as a substitute for it. Waterproofing first, protection second.
Step-by-step application
- Surface preparation: the surface must be clean, dry and smooth. Irregularities and cracks must be sealed with cement mortar or a waterproofing compound. This is followed by the waterproofing layer — a bituminous membrane or a cementitious waterproofing compound.
- Installation of the membrane: it is laid with the cones facing the wall, creating the drainage gap. Installation begins at the lowest point and works upwards, with an overlap of ~15 cm per sheet.
- Fixing: using special nails or plugs with washers at intervals of 50–60 cm at the top of the membrane. At the top, the membrane must extend at least 15 cm above the final ground level.
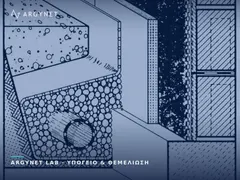
- Drainage pipe: a perforated pipe wrapped in geotextile is laid at the base, on top of a layer of gravel ~20 cm thick, to allow water to drain away.
- Protection & refilling: a geotextile is laid on top of the membrane to prevent the gaps from becoming blocked with soil — or a membrane with a geotextile already bonded to it is used. This is followed by careful backfilling, taking care not to damage the membrane.
The Three Most Common Failures
| Error in the field | Consistency |
|---|---|
| Cones facing the ground rather than the wall | No drainage gap is formed — water pools on the waterproofing |
| Overlap < 15 cm or unsealed joints | Water and soil penetration behind the membrane |
| Absence of drainage at the base | Water running down is not drained away — hydrostatic pressure at the base |
The membrane is merely the visible component. The waterproofing protection functions as a system: a fully bonded waterproofing layer, a dimpled drainage membrane with correctly oriented cones, a filtration geotextile and drainage to the base via a perforated pipe.
At ARGYNET, we specify the entire drainage system and calculate materials per m².
Related Products & Categories
Are you designing drainage for a basement or a retaining wall?
Request a Technical Quotation